こんにちは、ゆたんぽです。
本日は、「RequestNavigateでのパラメータ渡し」を説明していこうと思います。
RequestNavigateで画面遷移する際に、「前の画面からデータを受け渡したい!」ということがあると思います。
例えば、前回までに説明したプログラムでいうと、「日時を情報として渡して、画面遷移後に表示したい」などのような場面です。
今回の内容はそんな時に使用できますので、参考にしてください。
必要であれば、Prismの説明はPrism1以降で順に説明してますので参考に見てください。
目次
View2の画面遷移を実装
ここでは、パラメータ受け渡しの準備として、「View2」の画面遷移を作成していきます。
内容は前回と同じものですので簡単な説明は省かれていますので必要あれば、「4.Prismで画面遷移」をご覧ください。
View2の追加
新しいパラメータ渡しのサンプルとして、ViewとViewModelを作成していきます。
前回の内容と同様で新たにViewフォルダにView2を追加してください。PrismのUserControlで追加するやり方です。
わからない方はこちらを参考にしてください。

それではView2の中身を実装していきます。
<UserControl x:Class="Sample.Views.View2"
             xmlns="http://schemas.microsoft.com/winfx/2006/xaml/presentation"
             xmlns:x="http://schemas.microsoft.com/winfx/2006/xaml"
             xmlns:prism="http://prismlibrary.com/"
             prism:ViewModelLocator.AutoWireViewModel="True">
    <Grid>
        <StackPanel>
            <Label Content="View2"
                   FontSize="30"
                   Foreground="red"/>
            <Label Content="{Binding View2Label}"/>
        </StackPanel>
    </Grid>
</UserControl>
<StackPanel>で縦に順番に表示するようにしています。
次に”View2″というラベルを作成し、文字の大きさと色を指定しています。
最後に、”View2Label”という名前でLabelをバインディングしています。
View2ViewModel.csの実装
以下のように実装していきます。
using Prism.Commands;
using Prism.Mvvm;
using System;
using System.Collections.Generic;
using System.Linq;
namespace Sample.ViewModels
{
    public class View2ViewModel : BindableBase
    {
        public View2ViewModel()
        {
        }
        private string _view2Label = String.Empty;
        public string View2Label
        {
            get { return _view2Label; }
            set { SetProperty(ref _view2Label, value); }
        }
    }
}
先ほど”View2.xaml”で定義した、”View2Label”をバインディングしていきます。
今までと同様にString型でデータバインディングの記述を行います。
15行目は最初の入力値がないので、空のString型を定義します。
このような記述をしないとView2Labelが呼ばれた際にエラーになってしまうので気を付けましょう。
MainWindow.xamlの実装
”MainWindow”にView2の画面遷移を行うためのボタンを実装していきます。
<Window x:Class="Sample.Views.MainWindow"
        xmlns="http://schemas.microsoft.com/winfx/2006/xaml/presentation"
        xmlns:x="http://schemas.microsoft.com/winfx/2006/xaml"
        xmlns:prism="http://prismlibrary.com/"
        prism:ViewModelLocator.AutoWireViewModel="True"
        Title="{Binding Title}" Height="350" Width="525"
        WindowStartupLocation="CenterScreen">
    <!--←追加行-->
    <Grid>
        <StackPanel>
            <Label Content="システム日時"/>
            <Label Content="{Binding SystemData}"/>
            <Button Content="時間更新"
                    Command="{Binding UpdateButton}"/>
            <Button Content="View1"
                    Command="{Binding ShowView1Button}"/>
            <Button Content="View2"
                    Command="{Binding ShowView2Button}"/>
            <ContentControl prism:RegionManager.RegionName="ContentRegion" />
        </StackPanel>
    </Grid>
</Window>
View2という名前のボタンを”ShowView2Button”でバインディングする記述です。
これは、前回と全く同じ内容ですので説明は割愛しますが、16,17行目をコピペして、名前を編集するのが早いと思います。
MainWindowViewModel.csの実装
using Prism.Commands;
using Prism.Mvvm;
using Prism.Regions;
using Sample.Views;
using System;
namespace Sample.ViewModels
{
    public class MainWindowViewModel : BindableBase
    {
        private readonly IRegionManager _regionManager;
        private string _title = "Sample Application";
        public string Title
        {
            get { return _title; }
            set { SetProperty(ref _title, value); }
        }
        private string _systemData = DateTime.Now.ToString("yyyy年MM月dd日  HH時mm分ss秒");
        public string SystemData
        {
            get { return _systemData; }
            set { SetProperty(ref _systemData, value); }
        }
        public DelegateCommand UpdateButton { get; }
        public DelegateCommand ShowView1Button { get; }
        public DelegateCommand ShowView2Button { get; }
        public MainWindowViewModel(IRegionManager regionManager)
        {
            _regionManager = regionManager;
            UpdateButton = new DelegateCommand(UpdateButtonExe);
            ShowView1Button = new DelegateCommand(ShowView1ButtonExe);
            ShowView2Button = new DelegateCommand(ShowView2ButtonExe);
        }
        private void UpdateButtonExe()
        {
            SystemData = DateTime.Now.ToString("yyyy年MM月dd日  HH時mm分ss秒");
        }
        private void ShowView1ButtonExe()
        {
            _regionManager.RequestNavigate("ContentRegion",nameof(View1));
        }
        private void ShowView2ButtonExe()
        {
            _regionManager.RequestNavigate("ContentRegion", nameof(View2));
        }
    }
}
こちらの内容も前回と同じ内容で追加してください。
近くに前の記述があるのでうまくコピペをしていくのが良いと思います。
App.xaml.csの追加
こちらも同様の記述ですので、名前だけ変更してください。
using Sample.Views;
using Prism.Ioc;
using Prism.Modularity;
using System.Windows;
namespace Sample
{
    /// <summary>
    /// Interaction logic for App.xaml
    /// </summary>
    public partial class App
    {
        protected override Window CreateShell()
        {
            return Container.Resolve<MainWindow>();
        }
        protected override void RegisterTypes(IContainerRegistry containerRegistry)
        {
            containerRegistry.RegisterForNavigation<View1>();
            containerRegistry.RegisterForNavigation<View2>();
        }
    }
}
ここまで来たら一度デバッグを開始してみてください。

データバインディングする”View2Label”は空のままなので、”View2″の表記の下には何も表示されていません。
これから、 ”View2Label” についてパラメータ渡しの説明とともに、中身を記載していこうと思います。
View2ViewModelに“INavigationAware”を実装していきます。
“INavigationAware” は、画面遷移する際にイベントを起こすことができます。
このイベント時にパラメータを受け取る処理を記述していきます。
さっそく実装していきましょう。
View2ViewModelを以下のように実装してください。
using Prism.Commands;
using Prism.Mvvm;
using Prism.Regions;
using System;
using System.Collections.Generic;
using System.Linq;
namespace Sample.ViewModels
{
    public class View2ViewModel : BindableBase,INavigationAware
    {
        public View2ViewModel()
        {
        }
        private string _view2Label = String.Empty;
        public string View2Label
        {
            get { return _view2Label; }
            set { SetProperty(ref _view2Label, value); }
        }
    }
}
3行目に”using Prism.Regions;”の記述を行って、10行目のように”INavigationAware”を実装してください。
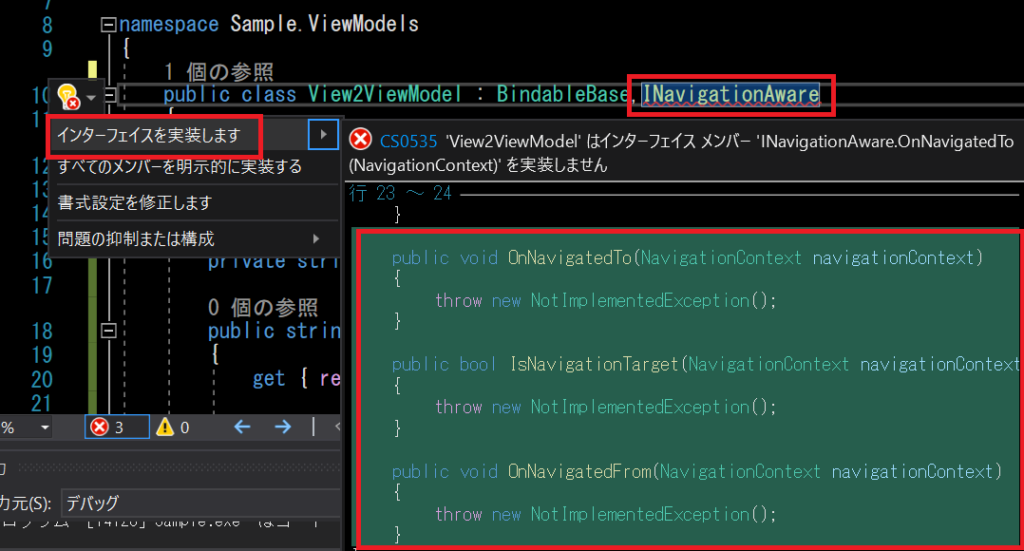
この時に以下の画像のようにINavigationAwareにエラー表記が出ると思います。

この際はINavigationAware上にカーソルを持っていき、「Ctrl+.」などを押して、上記のようにインターフェースの実装を行ってください。そうすることで、宣言が必要な関数が自動で生成されます。
using Prism.Commands;
using Prism.Mvvm;
using Prism.Regions;
using System;
using System.Collections.Generic;
using System.Linq;
namespace Sample.ViewModels
{
    public class View2ViewModel : BindableBase,INavigationAware
    {
        public View2ViewModel()
        {
        }
        private string _view2Label = String.Empty;
        public string View2Label
        {
            get { return _view2Label; }
            set { SetProperty(ref _view2Label, value); }
        }
        public void OnNavigatedTo(NavigationContext navigationContext)
        {
            throw new NotImplementedException();
        }
        public bool IsNavigationTarget(NavigationContext navigationContext)
        {
            throw new NotImplementedException();
        }
        public void OnNavigatedFrom(NavigationContext navigationContext)
        {
            throw new NotImplementedException();
        }
    }
}
”インターフェース”の実装をすることで上記のようなに3つの関数が実装されます。
追加された3つの関数の説明を以下の表で記載します。
| 関数名 | 説明 |
| OnNavigatedTo | 画面遷移してきたときに実行される。パラメータを受け取りたいときは、 navigationContextを使用して受け取ることができる。 |
| IsNavigationTarget | インスタンスの使いまわしをするかどうかを選択する。つまり、いろいろな画面に遷移した際に前回の値を記憶させるかどうかを決める。記憶させる場合はTrue、毎回新しく表示させたい場合はFalseにしておく。 |
| OnNavigatedFrom | ナビゲーションが他に移る際に実行される。つまり、他に画面が遷移するときで、終了時に処理をしたい場合、ここに記述する。 |
今回は、画面遷移したときにパラメータを受け取りたいので”OnNavigatedTo”を使用して受け取っていきます。
まず、それぞれ生成された関数に「throw new NotImplementedException();」が作成されていますので、これを削除していきます。
「throw new NotImplementedException();」は、要求されたメソッドまたは操作が実装されない場合にスローされる例外で、そのままにしておくとコンパイルエラーが発生します。
using Prism.Commands;
using Prism.Mvvm;
using Prism.Regions;
using System;
using System.Collections.Generic;
using System.Linq;
namespace Sample.ViewModels
{
    public class View2ViewModel : BindableBase,INavigationAware
    {
        public View2ViewModel()
        {
        }
        private string _view2Label = String.Empty;
        public string View2Label
        {
            get { return _view2Label; }
            set { SetProperty(ref _view2Label, value); }
        }
        public void OnNavigatedTo(NavigationContext navigationContext)
        {
            View2Label = navigationContext.Parameters.GetValue<string>(nameof(View2Label));
        }
        public bool IsNavigationTarget(NavigationContext navigationContext)
        {
            return false;
        }
        public void OnNavigatedFrom(NavigationContext navigationContext)
        {
        }
    }
}
“IsNavigationTarget”はreturn でbool型で返さないとコンパイルエラーになりますので、ひとまず「return false;」の記述をします。
OnNavigatedToではパラメータを受け取るコーティングをしています。
これは呼び出し元より「View2Label」というキーワードでパラメータが与えられることが想定されています。
実際の実装は、View2ViewModelで実装していきます。
navigationContext.Parameters.GetValue(nameof(MyLabel));で記載したように、GetValueでパラメータのキーワードを指定して、必要なパラメータを取り出しています。
呼び出し元と同じキーワードにすることでパラメータの取り出しができますので呼び出し側のパラメータと合わせるようにしましょう。
using Prism.Commands;
using Prism.Mvvm;
using Prism.Regions;
using Sample.Views;
using System;

namespace Sample.ViewModels
{
    public class MainWindowViewModel : BindableBase
    {
        private readonly IRegionManager _regionManager;

        private string _title = "Sample Application";

        public string Title
        {
            get { return _title; }
            set { SetProperty(ref _title, value); }
        }

        private string _systemData = DateTime.Now.ToString("yyyy年MM月dd日  HH時mm分ss秒");

        public string SystemData
        {
            get { return _systemData; }

            set { SetProperty(ref _systemData, value); }
        }

        public DelegateCommand UpdateButton { get; }

        public DelegateCommand ShowView1Button { get; }

        public DelegateCommand ShowView2Button { get; }

        public MainWindowViewModel(IRegionManager regionManager)
        {
            _regionManager = regionManager;

            UpdateButton = new DelegateCommand(UpdateButtonExe);

            ShowView1Button = new DelegateCommand(ShowView1ButtonExe);

            ShowView2Button = new DelegateCommand(ShowView2ButtonExe);
        }

        private void UpdateButtonExe()
        {
            SystemData = DateTime.Now.ToString("yyyy年MM月dd日  HH時mm分ss秒");
        }

        private void ShowView1ButtonExe()
        {
            _regionManager.RequestNavigate("ContentRegion",nameof(View1));
        }

        private void ShowView2ButtonExe()
        {
            var p = new NavigationParameters();

            p.Add(nameof(View2ViewModel.View2Label),SystemData);

            _regionManager.RequestNavigate("ContentRegion", nameof(View2),p);
        }

    }
}
まず、NavigationParameters()をnewで生成して、変数pに格納しています。
これは、パラメータを渡す専門の変数と認識していればいいでしょう。
次に、”p.Add()”でpに値を追加します。
第一引数は、先ほど宣言したキーワードです。統一させるために、nameofでView2ViewModelの”View2Label”として、宣言しています。
第二引数は、実際に渡す値をいれます。今回は、SystemDataを渡す値として追加しています。
最後に、RequestNavigateの第3引数で、渡すパラメータを宣言することができます。
ここまでで実装は終了です。
実際にデバッグを開始して確認してみてください。

試しに、時間更新を押してから、もう一度”View2”を押すと値がしっかりと渡されていることがわかると思います。
まとめ&次回予告
ここまでで、RequestNavigateを使用したパラメータ渡しができるようになりました。
パラメータは複数追加できるので応用して試してください。
次回は、ポップアップを出す方法を記事にしていこうと思いますので、よろしくお願いします。
 6.Prism ダイアログの表示
 ゆたんぽBLOG
