こんにちは、ゆたんぽです。
引き続き改善報告で紹介したModelからView、ViewModelへの自動展開を紹介していこうと思います。
前回2つのまでの記事を下に載せます。
今回はViewModel部分を紹介していきます。
目次
ViewModelの構想
まず、実装の中身を紹介する前に考え方について説明します。
ViewModel側でやりたいことは「前回作成したParamDecimalのクラスの情報を持った画像処理のクラスから情報を取得して、View側と紐づけること」です。
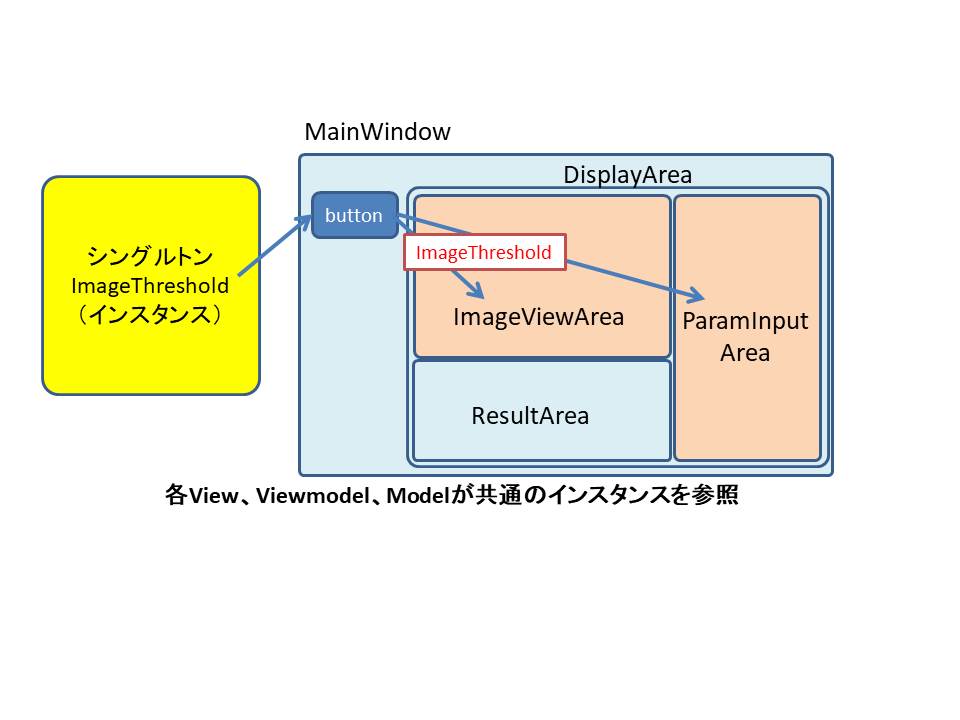
イメージは以下の図のような感じです。

上記のようにAppSetting(シングルトン)で各画像処理クラスのインスタンスを唯一取得するようにします。
AppSettingでインスタンス化した唯一のクラスをパラメータとして受け渡して、パラメータを区別して連動させていくイメージです。
ImageViewAreaではImageを取り出して画像を紐づけますし、ParamInputAreaでは、前回Model側の説明で作成したPrmManagerのPrmListを取り出して、パラメータを紐づけて表示します。
このようにして、ボタンを押した際に指定した画像処理の画像とパラメータが結びつくことで画像処理を行うことができます。
ViewModelの実装
上記の構想をもとに実装していきます。
AppSetting
AppSettingは以前作成したシングルトンになりますので、説明は割愛させていただきます。
今回は、シングルトンで作成したImageThresholdを使っていきます。
MainWindowViewModel
ここでは、HambergerMenuで作成したボタンをトリガに、各画像処理の情報をシングルトンから取得し渡し、画面遷移をします。
ーーーーーーーーーーーーーーーーーーーーーー前のプログラムは割愛ーーーーーーーーーーーーーーーーーーーーーーーーーーー

        /// <summary>HamburgerMenuのメニュー項目選択通知イベントハンドラ。</summary>
        /// <param name="item">選択したメニュー項目を表すHamburgerMenuItemViewModel。</param>
        private void onSelectedMenu(HamburgerMenuItemViewModel item)
        {
            if (item == null)
                return;
            if (string.IsNullOrEmpty(item.NavigationPanel))
                return;

            switch (item.NavigationPanel)
            {
                case nameof(ImageProcessExe):
                    Ipe = AppSetting.Instance.IPr;//③
                    break;

                case nameof(ImageThreshold):
                    Ipe = AppSetting.Instance.ITh;//④
                    break;

                case nameof(ImageGausisanBlur):
                    Ipe = AppSetting.Instance.IGb;
                    break;

                case nameof(ImageLaplacian):
                    Ipe = AppSetting.Instance.ILa;
                    break;

                default:
                    break;
            }

            var p = new NavigationParameters();

            p.Add("DataSource", Ipe);

            _regionManager.RequestNavigate("DisplayArea", nameof(DisplayArea), p);

        }

        /// <summary>HamburgerMenuのメニュー項目を初期化します。</summary>
        private void initialilzeMenu()
        {
            this.MenuItems.Add(new HamburgerMenuItemViewModel(PackIconFontistoKind.Safari, "ImageGray", nameof(ImageProcessExe)));
            //this.MenuItems.Add(new HamburgerMenuItemViewModel(PackIconFontAwesomeKind.ImageRegular, "ImageGray", nameof(ImageProcessExe)));
            this.MenuItems.Add(new HamburgerMenuItemViewModel(PackIconFontAwesomeKind.ImageSolid, "ImageThreshold", nameof(ImageThreshold)));
            this.MenuItems.Add(new HamburgerMenuItemViewModel(PackIconFontAwesomeKind.FilterSolid, "ImageGaussianBlur", nameof(ImageGausisanBlur)));
            this.MenuItems.Add(new HamburgerMenuItemViewModel(PackIconFontAwesomeKind.LemonRegular, "ImageLaplasian", nameof(ImageLaplacian))) ;

            this.OptionMenuItems.Add(new HamburgerMenuItemViewModel(PackIconFontAwesomeKind.CogsSolid, "設定", "SettingPanel"));
            this.OptionMenuItems.Add(new HamburgerMenuItemViewModel(PackIconFontAwesomeKind.InfoCircleSolid, "このサンプルアプリについて", "AboutPanel"));
        }

        private void SaveExe()
        {
            Ipe.ImageSave();
        }

        #endregion

    }
}
まずは、ボタンの紐づけを行います。
ボタンはHambergerMenu実装時に説明しましたが、initializeMenuの詳細を説明していなかったので説明します。
this.MenuItems.Add(new HamburgerMenuItemViewModel(PackIconFontAwesomeKind.ImageSolid, “ImageThreshold”, nameof(ImageThreshold)));
上記においてHambergerMenuItemViewModelでは、コンストラクタの引数でボタンのアイコン、表示する名前、navigationPanelの順に入れていいますが、今回必要なのはnavigationPanelの部分です。
ボタンを押したときに使用したい画像処理のクラス名を入れるようにしています。
今回はImageThresholdを使用したいので3つ目の引数にnameof(ImageThreshold)を使って指定します。
nameof関数を使用するとクラス名を間違いにくくなるので指定してください。
画像処理の名前を入れたnavigationPanelの情報をもとに、条件分けでImageProcessの変数であるIpeに各画像処理のシングルトンで作成したクラスを格納していきます。
まず、ボタンが押されるとonSelectedMenuのメソッドが起動します。
switch文では、item.NavigationPanelの中身を確認してImageProcessの変数Ipeにシングルトンで定義した画像処理のクラスを導入しています。
例えば、item.NavigationPanelの中身がnameof(ImageThreshold)の場合、IpeにImageThresholdクラスを格納します。
p.Add(“DataSource”, Ipe)では、”DataSource”をキーとして先ほど導入したIpeをパラメータとして格納します。
_regionManager.RequestNavigate(“DisplayArea”, nameof(DisplayArea), p)では、”DisplayArea”にパラメータ受け渡しと共に画面遷移を行っています。
この流れでボタンに関連した画像処理の情報からシングルトンで作成した画像処理クラスを画面遷移のパラメータとして受け渡します。
DisplayAreaの画面遷移
上記のRequestNavigateによって、”DisplayArea”の画面遷移を行ったので、DisplayAreaViewModelでパラメータを受け取った後の処理を実装していきます。
using OpenCV_Prism.Abstract;
using OpenCV_Prism.Models;
using OpenCV_Prism.Views;
using Prism.Commands;
using Prism.Mvvm;
using Prism.Regions;
using System;
using System.Collections.Generic;
using System.Linq;

namespace OpenCV_Prism.ViewModels
{
    public class DisplayAreaViewModel : BindableBase, INavigationAware
    {
        #region 【メンバー】

        private readonly IRegionManager _regionManager;

        #endregion

        public DisplayAreaViewModel(IRegionManager regionManager)
        {
            _regionManager = regionManager;

            _regionManager.RegisterViewWithRegion("ImageViewArea", typeof(ImageViewArea));
        }

        public bool IsNavigationTarget(NavigationContext navigationContext)
        {
            return true;
        }

        public void OnNavigatedFrom(NavigationContext navigationContext)
        {
        }

        public void OnNavigatedTo(NavigationContext navigationContext)
        {
            var p = navigationContext.Parameters;

            //画像表示
            _regionManager.RequestNavigate("ImageViewArea", nameof(ImageViewArea), p);

            //パラメータ表示
            _regionManager.RequestNavigate("ParamInputArea", nameof(ParamDisplay), p);

        }
    }
}
OnNavigatedToで前の画面から画面遷移した際にパラメータをそのまま渡して画面遷移を再度行います。
ImageViewAreaとParamInputAreaへパラメータを渡して画面遷移します。
ImageViewAreaViewModelの実装
次に上記のDisplayAreaで画面遷移したImageViewAreaです。
using OpenCV_Prism.Abstract;
using OpenCV_Prism.Models;
using Prism.Commands;
using Prism.Mvvm;
using Prism.Regions;
using Reactive.Bindings;
using Reactive.Bindings.Extensions;
using System;
using System.Collections.Generic;
using System.Drawing;
using System.Linq;
using System.Reactive.Disposables;
using System.Windows.Media.Imaging;

namespace OpenCV_Prism.ViewModels
{
    public class ImageViewAreaViewModel : BindableBase, INavigationAware
    {
        // リアクティブプロパティ破棄
        protected CompositeDisposable _disposables = new CompositeDisposable();

        ImageProcess Ipe;

        public ReactiveProperty<BitmapImage> Image { get; set; }

        public ImageViewAreaViewModel()
        {
            Ipe = AppSetting.Instance.IPr;

            ImageSelect = new DelegateCommand(ImageSelectExe);

            ImageProcess = new DelegateCommand(ImageProcessExe);

            Image = Ipe.ToReactivePropertyAsSynchronized(x => x.Image)
                .AddTo(_disposables);
        }

        public DelegateCommand ImageSelect { get; set; }

        public DelegateCommand ImageProcess{ get; set; }

        #region 【InavigateAware】

        public void OnNavigatedTo(NavigationContext navigationContext)
        {
            Ipe = navigationContext.Parameters.GetValue<ImageProcess>("DataSource") as ImageProcess;

            Image = Ipe.ToReactivePropertyAsSynchronized(x => x.Image)
                        .AddTo(_disposables);
        }

        public bool IsNavigationTarget(NavigationContext navigationContext)
        {
            return true;
        }

        public void OnNavigatedFrom(NavigationContext navigationContext)
        {
        }

        #endregion


        #region 【メソッド】
        private void ImageSelectExe()
        {
            Ipe.ImageSelect();
        }

        private void ImageProcessExe()
        {
            Ipe.myRun();
        }

        #endregion
    }
}
ここでもOnNavigatedToで画面遷移してきた際の処理を記述します。
受け取ったパラメータをImageProcessの形でIpeに格納して受け取ります。
その後、受け取ったIpeのImageとreactivepropertyでBitmapImage型のImageを紐づけていきます。
これによって、シングルトンでインスタンス化した画像処理のクラスの画像と画面表示が紐づくようになります。
ParamInputAreaの実装
次に、ParamInputAreaへの表示です。
ここでは、ParamDisplayを表示しますのでParamDisplayViewModelを編集します。
ここが今回のModel→Viewへのパラメータ展開の肝となります。
using OpenCV_Prism.Abstract;
using OpenCV_Prism.Models;
using Prism.Commands;
using Prism.Mvvm;
using Prism.Regions;
using Reactive.Bindings;
using System;
using System.Collections.Generic;
using System.Collections.ObjectModel;
using System.Linq;
using System.Reactive.Disposables;

using Reactive.Bindings.Extensions;
using OpenCV_Prism.Param;

namespace OpenCV_Prism.ViewModels
{
    public class ParamDisplayViewModel : BindableBase, INavigationAware
    {
        // リアクティブプロパティ破棄
        protected CompositeDisposable _disposables = new CompositeDisposable();

        ImageProcess Ipe;

        public ReadOnlyReactiveCollection<object> ItemsSource { get; private set; }

        public ParamDisplayViewModel()
        {
        }


        public void OnNavigatedTo(NavigationContext navigationContext)
        {
            var p = navigationContext.Parameters;

            Ipe = p.GetValue<ImageProcess>("DataSource") as ImageProcess;

            // パラメータコントロール作成
            var obs = new ObservableCollection<object>();

            foreach (var item in Ipe.PrmManager.ParamList)
            {
                switch (item)
                {
                    case ParamString ps:
                        obs.Add(new ParamStringViewModel(ps));
                        break;

                    case ParamDecimal pr:
                        obs.Add(new ParamDecimalViewModel(pr));
                        break;

                    case ParamBool pb:
                        obs.Add(new ParamBoolViewModel(pb));
                        break;

                    default:
                        obs.Add(item);
                        break;
                }
            }

            ItemsSource = obs.ToReadOnlyReactiveCollection()
                 .AddTo(_disposables);
        }

        public bool IsNavigationTarget(NavigationContext navigationContext)
        {
            return true;
        }

        public void OnNavigatedFrom(NavigationContext navigationContext)
        {
        }

    }
}
ParamDisplayのView側で持っていたItemSourcesをデータバインディングするため、
ReadOnlyReactiveCollectionのobject型でプロパティを用意します。
OnNavigatedToで画面遷移時に以下の処理をします。
まず、OnNavigatedToで投げられたパラメータを取得し、ImageProcess型でIpeに保存します。
次にobject型のObservableCollectionをobsとして作成します。
これはItemSourcesとバインディングするためのリストを作成するものです。
先ほど画面遷移時に受け取ったパラメータを格納したIpeの中にある、ParamListでForeachをかけます。
ParamListはModel編で説明した通り画像処理のクラスが全て継承している、ImageProcessクラスの中に記述してあります。
その後、Switchを使用してPramListがParamDecimal型だったら、ParamDecimalViewModelにParamDecimalのクラスに変換して、ParamDecimalクラスを引数とした新しいParamDecimalViewModelをobsに追加する。
ParamDecimalViewModelはまだ用意されていませんが、ParamDecimalViewModelでは、上記の追加時にNameやValueをReactivePropertyで紐づけて、object型のObservableCollectionに追加していく役割があります。
最後にItemSourcesと紐づけるためにobject型のObservableCollectionとItemSourcesを紐づける。
上記をやることでViewModel側で作成したParamDecimal型のリストがView側のItemSourcesと紐づくのでその情報をもとにView側にパラメータ一式が表示されます。
ParamDecimalViewModel
上記であげたParamDecimalクラスのViewModelを作成します。
ここでは、今までとは違い新しくViewModelのクラスを作る必要があります。
using OpenCV_Prism.Abstract;
using OpenCV_Prism.Models;
using OpenCV_Prism.Param;
using Prism.Commands;
using Prism.Mvvm;
using Reactive.Bindings;
using Reactive.Bindings.Extensions;
using System;
using System.Collections.Generic;
using System.Linq;
using System.Reactive.Disposables;

namespace OpenCV_Prism.ViewModels
{
    public class ParamDecimalViewModel : BindableBase
    {
        #region プロパティ

        protected CompositeDisposable _disposable { get; } = new CompositeDisposable();

        public ReadOnlyReactivePropertySlim<string> ParamName { get; }

        public ReactivePropertySlim<decimal> ConstValue { get; }

        public ReadOnlyReactivePropertySlim<decimal> Max { get; }

        public ReadOnlyReactivePropertySlim<decimal> Min { get; }

        public ReadOnlyReactivePropertySlim<decimal> Inter { get; }

        public ReadOnlyReactivePropertySlim<string> StringFormat { get; }


        #endregion

        public ParamDecimalViewModel(ParamDecimal paramDecimal)
        {
            ParamName = paramDecimal.ObserveProperty(x => x.Name)
                .ToReadOnlyReactivePropertySlim()
                .AddTo(_disposable);

            ConstValue = paramDecimal.ToReactivePropertySlimAsSynchronized(x => x.Value)
                  .AddTo(_disposable);

            Max = paramDecimal.ObserveProperty(x => x.Maximum)
                .ToReadOnlyReactivePropertySlim()
                .AddTo(_disposable);

            Min = paramDecimal.ObserveProperty(x => x.Minimum)
                .ToReadOnlyReactivePropertySlim()
                .AddTo(_disposable);

            Inter = paramDecimal.ObserveProperty(x => x.Interval)
                .ToReadOnlyReactivePropertySlim()
                .AddTo(_disposable);

            StringFormat = paramDecimal.ObserveProperty(x => x.StringFormat)
                .ToReadOnlyReactivePropertySlim()
                .AddTo(_disposable);
        }
    }
}
ReactivePropertyでParamDecimalにあるプロパティを用意します。
Value以外はModel→Viewへの一方通行の情報渡しなので、ReadOnlyをつけたReactiveRropertyとなっています。
コンストラクタでParamDecimalクラスを受け取って、今まで通りReactiveRropertyで中の情報をそれぞれ紐づけています。
valueは、Model⇔Viewの両方向の情報渡しなのでToReactivePropertySlimAsSynchronizedで紐づけていきます。
それ以外は、ObservePropertyでToReadOnlyReactivePropertySlimを使って紐づけます。
ReactiveRropertyのSlimかどうかですが、あまり気にしなくてよいです。
とりあえず、ReactiveRropertyをしておけば問題ないです。
少し説明するとSlimは値変更時のView側でのイベントなどが必要でなければSlimで大丈夫です。
動作確認
それでは以上の実装は終わりだと思います。
結構長かったので抜けあるかもですが間違いに気づいたらコメントいただけると幸いです。

上記のようにHambergerMenuで追加したボタンを押すとModel側で実装したParamDecimalなどのパラメータが切り替わると成功です。
画像処理を行うとパラメータも反映されていることが確認できれば、リンクもしていることがわかります。
まとめ&次回予告
3部構成で説明してきましたが、長かったのでわかりにくい部分もあったと思います。
何かあればコメントをお願いします。
Model側で実装した情報でViewまで展開して情報を紐づけれ切れば、いろいろできることが広がると思いますのでぜひ活用していければと思います。
次回は、画像処理した画像の保存機能を追加していきます。
 ゆたんぽBLOG


