こんにちは、ゆたんぽです。
今回は、前回作成したシングルトンを利用してパラメータ入力を行っていこうと思います。
閾値処理であるThresholdのthreshとmaxvalのパラメータを画面から入力できるようにしていきます。
では、さっそく説明していきます。
Viewの作成
まずは、パラメータを入力するViewを作成していきます。
いつも通り、ParamInputAreaThresholdという名前のUserControlを作成してください。
<UserControl x:Class="OpenCV_Prism.Views.ParamInputAreaThreshold"
             xmlns="http://schemas.microsoft.com/winfx/2006/xaml/presentation"
             xmlns:x="http://schemas.microsoft.com/winfx/2006/xaml"
             xmlns:prism="http://prismlibrary.com/"
             prism:ViewModelLocator.AutoWireViewModel="True">
    <Grid Width="auto" Height="auto">
        <Border BorderThickness="1" BorderBrush="Black">
            <StackPanel VerticalAlignment="Top" HorizontalAlignment="Left" Margin="10">
                <TextBlock Text="Threshold" HorizontalAlignment="Left" FontSize="20"/>
                <TextBox Width="200" BorderThickness="1" HorizontalAlignment="Left" FontSize="20"
                         Text="{Binding Threshold.Value, UpdateSourceTrigger=PropertyChanged}" >
                </TextBox>
                <TextBlock Text="MaxVal" HorizontalAlignment="Left" Margin="0,10,0,0" FontSize="20"/>
                <TextBox Width="200" BorderThickness="1" HorizontalAlignment="Left" FontSize="20"
                         Text="{Binding MaxVal.Value, UpdateSourceTrigger=PropertyChanged}" >
                </TextBox>
            </StackPanel>
        </Border>
    </Grid>
</UserControl>
上記のようにThresholdのthreshとmaxvalを入力する2つのテキストボックスを用意しています。
Text="{Binding Threshold.Value, UpdateSourceTrigger=PropertyChanged}"上記では、データを関連付けるためにデータバインディングを行っています。
UpdateSourceTriggerをPropertyChangedにすることで値が変更されたときに通知される設定になります。
ViewModel実装
先ほどParamInputAreaThresholdのViewを作成した際に作成されたParamInputAreaThresholdを実装していきます。
using OpenCV_Prism.Models;
using Prism.Commands;
using Prism.Mvvm;
using Reactive.Bindings;
using Reactive.Bindings.Extensions;
using System;
using System.Collections.Generic;
using System.Linq;
using System.Reactive.Disposables;

namespace OpenCV_Prism.ViewModels
{
    public class ParamInputAreaThresholdViewModel : BindableBase
    {
        #region 【メンバー】

        // リアクティブプロパティ破棄
        protected CompositeDisposable _disposables = new CompositeDisposable();

        ImageThreshold imageThreshold;//①

        #endregion

        #region 【プロパティ】//②

        public ReactiveProperty<string> Threshold { get; }

        public ReactiveProperty<string> MaxVal { get;}

        #endregion

        public ParamInputAreaThresholdViewModel()
        {
            imageThreshold = AppSetting.Instance.ITh;//③

            Threshold = imageThreshold.ToReactivePropertyAsSynchronized(x => x.Threshold)//④
                .AddTo(_disposables);

            MaxVal = imageThreshold.ToReactivePropertyAsSynchronized(x => x.MaxVal)
                .AddTo(_disposables);

        }
    }
}
①閾値処理であるImageThresholdクラスを宣言しています。
②プロパティでは、先ほどViewで作成した2つのテキストボックスをデータバインディングするために同じ名前を宣言しています。View⇔ViewModel⇔Model間を紐づけるためReactiveRropertyを使用しています。
③ ①で宣言したimageThresholdにシングルトンであるAppSettingでインスタンス化したImageThresholdを代入しています。Instanceを使用して ImageThreshold を呼び出すことができます。
④ ②で作成したReactivePropertyをModel側へ紐づけています。ImageThresholdクラスの中にThresholdとMaxValのプロパティがあるので紐づけています。
画面遷移の設定
Viewの画面遷移を行うために、DisplayAreaViewModelを実装していきます。前回作成済みのDisplayAreaを編集していきます。
using OpenCV_Prism.Abstract;
using OpenCV_Prism.Models;
using OpenCV_Prism.Views;
using Prism.Commands;
using Prism.Mvvm;
using Prism.Regions;
using System;
using System.Collections.Generic;
using System.Linq;

namespace OpenCV_Prism.ViewModels
{
    public class DisplayAreaViewModel : BindableBase, INavigationAware
    {
        #region 【メンバー】

        private readonly IRegionManager _regionManager;

        #endregion

        public DisplayAreaViewModel(IRegionManager regionManager)
        {
            _regionManager = regionManager;

            _regionManager.RegisterViewWithRegion("ImageViewArea", typeof(ImageViewArea));
        }

        public bool IsNavigationTarget(NavigationContext navigationContext)
        {
            return true;
        }

        public void OnNavigatedFrom(NavigationContext navigationContext)
        {
        }

        public void OnNavigatedTo(NavigationContext navigationContext)
        {
            var p = navigationContext.Parameters;

            _regionManager.RequestNavigate("ImageViewArea", nameof(ImageViewArea), p);

            var screenInfo = p.GetValue<string>("ScreenInfo");//①

            switch (screenInfo)//②
            {
                case nameof(ImageProcessExe):
                    break;

                case nameof(ImageThreshold):
                    _regionManager.RequestNavigate("ParamInputArea", nameof(ParamInputAreaThreshold));
                    break;

                default:
                    break;
            }

        }
    }
}
①GetValueを使用して、“ScreenInfo”をキーとして情報をscreenInfoに格納しています。この時、Grayボタンが押されればnameof(ImageProcessExe)、Threボタンが押されればnameof(ImageThreshold)が格納されます。
②Switch文を使用して、screenInfoの内容で分岐しています。今回、nameof(ImageThreshold)の時にパラメータを入力するViewを表示したいので、RequestNavigateを使用して、“ParamInputArea”のエリアにParamInputAreaThresholdのViewを表示するようにしています。
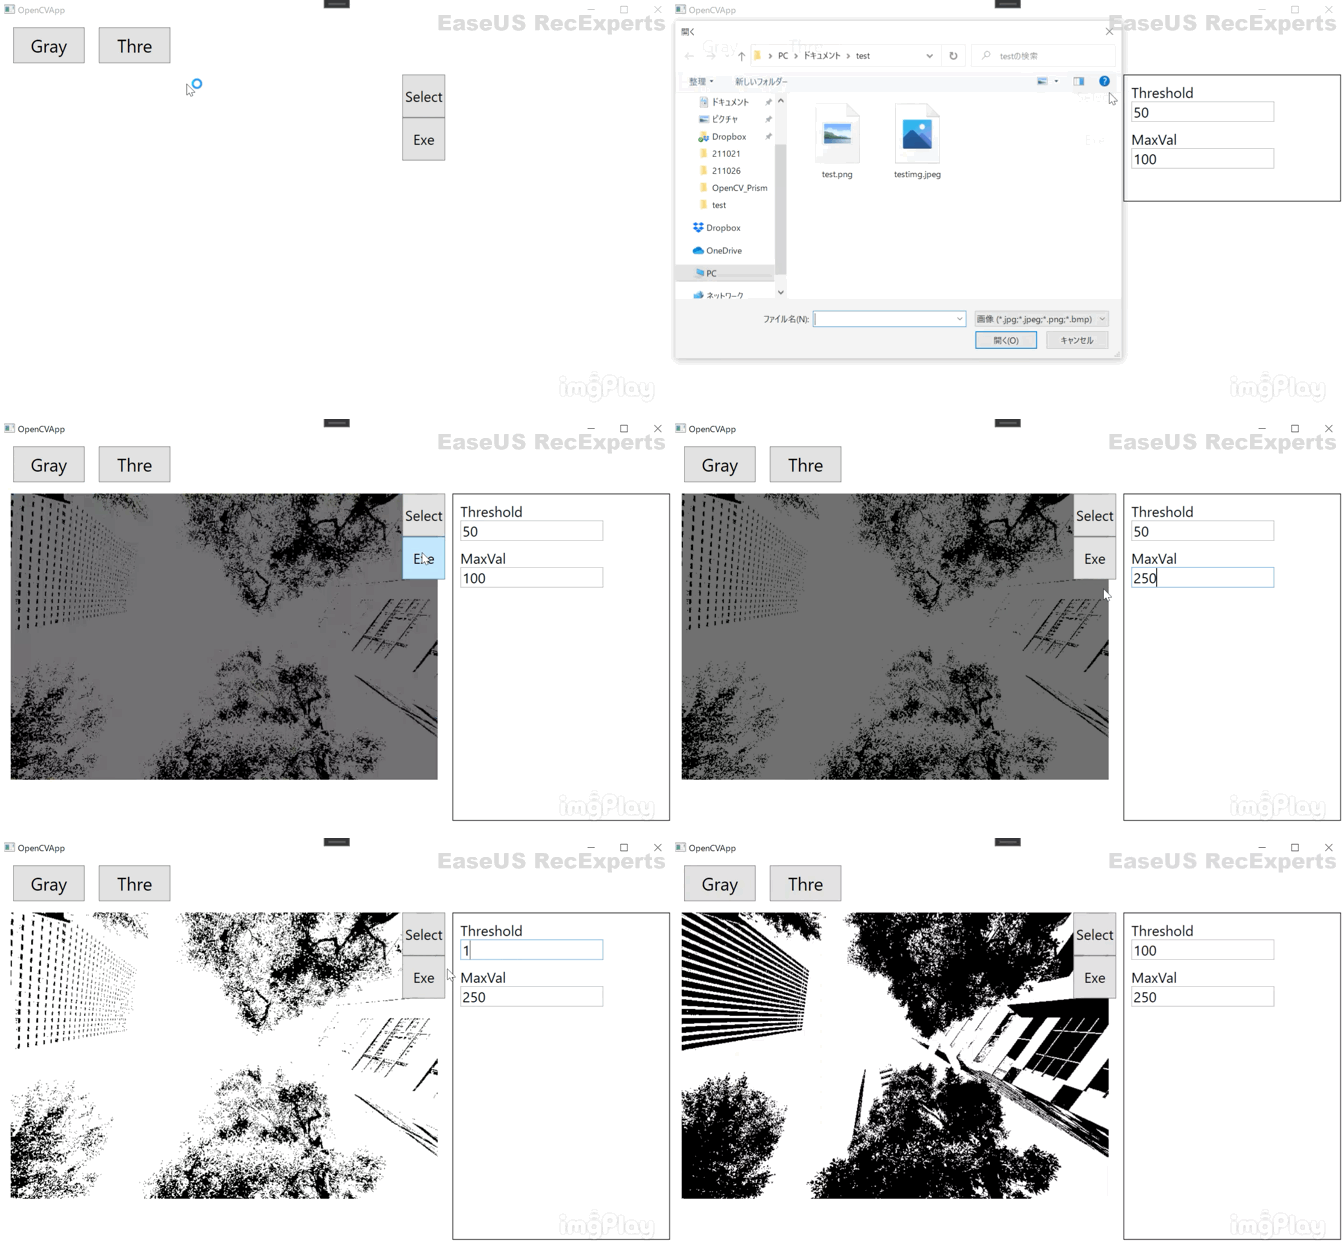
ここまで出来たら起動してみましょう。

上記のようにThreボタンを押したら作成したParamInputAreaThresholdが表示されて、パラメータを書き換えて画像処理を実行するとパラメータ内容が反映されていたら成功です。
まとめ&次回予告
今回は、シングルトンを利用してパラメータ入力を行えることができました。この流れを踏襲すれば様々な画像処理でパラメータ入力を反映することができるようになります。
次回は、フィルタ処理を実装していこうと思います。
 ゆたんぽBLOG

