こんにちは、ゆたんぽです。
引き続き、Prism、ReactiveProperty、OpenCVを利用した画像処理アプリを作成していきます。
今回は、アプリの画面デザインをMahAppsMahApps.Metroを使って変更していきます。
目次
MahApp.Metroの利用準備
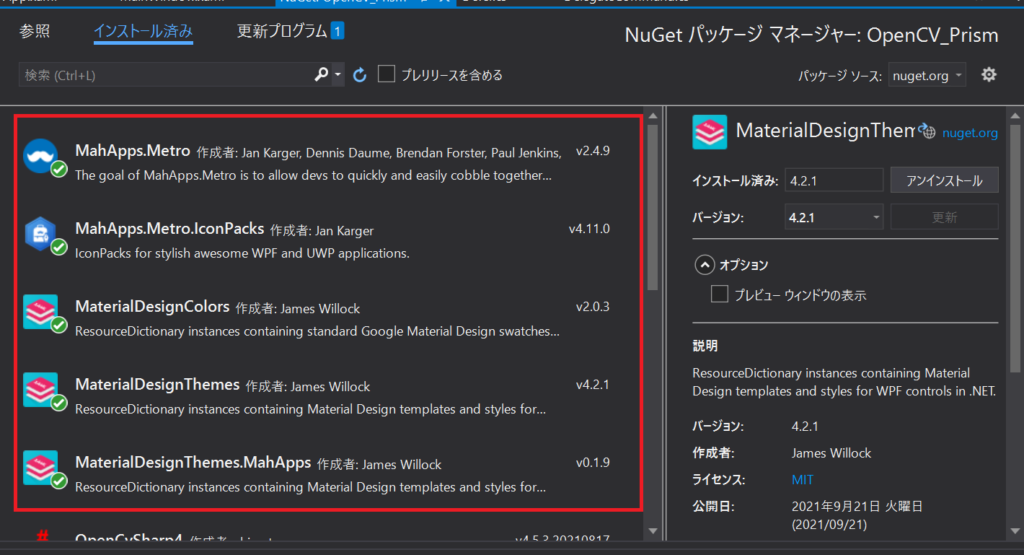
以下5つのツールをインストールしていきます。
1.MahApps.Metro
2.MahApps.Metro.IconPacks
3.MaterialDesignColors
4.MaterialDesignThemes
5.MaterialDesignThemes.MahApps
それぞれNuGetで検索ワードなどを入れて探してみてください。
最新版をダウンロードして問題ないと思います。
私は以下の画像のバージョンを使用して実装しました。

また、MahApps.Metro.IconPacksは今回は使用しませんのでインストールしなくてもよいです。
今後使用する際にまた説明します。
実装
インストールが終わったら実際に使用するためのコードを実装していきます。
MainWindow.xamlの実装
<mah:MetroWindow x:Class="OpenCV_Prism.Views.MainWindow"
        xmlns="http://schemas.microsoft.com/winfx/2006/xaml/presentation"
        xmlns:x="http://schemas.microsoft.com/winfx/2006/xaml"
        xmlns:prism="http://prismlibrary.com/"
        prism:ViewModelLocator.AutoWireViewModel="True"
        xmlns:mah="http://metro.mahapps.com/winfx/xaml/controls"
        xmlns:iconPacks="http://metro.mahapps.com/winfx/xaml/iconpacks"
        Title="{Binding Title}"
        TitleCharacterCasing="Normal"
        Width="auto"
        Height="auto"
        MinWidth="900"
        MinHeight="600">
    <Grid>
        <StackPanel>
            <StackPanel Orientation="Horizontal"
                        HorizontalAlignment="Left"
                        Margin="10">
                <Button Content="Gray"
                        Command="{Binding ShowImgageProcess}"
                        Margin="10,0,10,0"
                        FontSize="25"
                        Height="50"
                        Width="100">
                </Button>
                <Button Content="Thre"
                        Command="{Binding ShowImageThreshold}"
                        Margin="10,0,10,0"
                        FontSize="25"
                        Height="50"
                        Width="100">
                </Button>
            </StackPanel>
            <mah:TransitioningContentControl prism:RegionManager.RegionName="DisplayArea" />
        </StackPanel>
    </Grid>
</mah:MetroWindow>
MetroWindowを使用していきます。
xmlns:mah="http://metro.mahapps.com/winfx/xaml/controls"まずは、6行目にある上のコードを追記してください。これにより、MetroWindowが使用できるようになります。
mah:MetroWindow x:Class="OpenCV_Prism.Views.MainWindow"次に1行目にある上のコードにあるハイライト部分を追記していきます。
すると37行目も自動にMetroWindowに変更されます。
MainWindow.xaml.csの実装
using MahApps.Metro.Controls;
using System.Windows;

namespace OpenCV_Prism.Views
{
    /// <summary>
    /// Interaction logic for MainWindow.xaml
    /// </summary>
    public partial class MainWindow : MetroWindow
    {
        public MainWindow()
        {
            InitializeComponent();
        }
    }
}
次にMainWindow.xaml.csを編集します。
public partial class MainWindow : MetroWindowusing MahApps.Metro.Controls;を1行目に追記して上記のようにMetroWindowを継承してください。
App.xamlの実装
最後にApp.xamlを編集していきます。
    <prism:PrismApplication x:Class="OpenCV_Prism.App"
                 xmlns="http://schemas.microsoft.com/winfx/2006/xaml/presentation"
                 xmlns:x="http://schemas.microsoft.com/winfx/2006/xaml"
	             xmlns:prism="http://prismlibrary.com/"
                 xmlns:mah="http://metro.mahapps.com/winfx/xaml/controls"
                 xmlns:local="clr-namespace:OpenCV_Prism">
        <Application.Resources>
            <ResourceDictionary>
                <ResourceDictionary.MergedDictionaries>

                    <!-- MahApps -->
                    <ResourceDictionary Source="pack://application:,,,/MahApps.Metro;component/Styles/Controls.xaml"/>
                    <ResourceDictionary Source="pack://application:,,,/MahApps.Metro;component/Styles/Fonts.xaml"/>
                    <ResourceDictionary Source="pack://application:,,,/MahApps.Metro;component/Styles/Themes/Light.Violet.xaml"/>

                    <!-- Material Design -->
                    <ResourceDictionary Source="pack://application:,,,/MaterialDesignThemes.Wpf;component/Themes/MaterialDesignTheme.Light.xaml" />
                    <ResourceDictionary Source="pack://application:,,,/MaterialDesignThemes.Wpf;component/Themes/MaterialDesignTheme.Defaults.xaml" />
                    <ResourceDictionary Source="pack://application:,,,/MaterialDesignColors;component/Themes/Recommended/Primary/MaterialDesignColor.DeepPurple.xaml" />
                    <ResourceDictionary Source="pack://application:,,,/MaterialDesignColors;component/Themes/Recommended/Accent/MaterialDesignColor.Lime.xaml" />

                    <!-- Material Design: MahApps Compatibility -->
                    <ResourceDictionary Source="pack://application:,,,/MaterialDesignThemes.MahApps;component/Themes/MaterialDesignTheme.MahApps.Fonts.xaml" />
                    <ResourceDictionary Source="pack://application:,,,/MaterialDesignThemes.MahApps;component/Themes/MaterialDesignTheme.MahApps.Flyout.xaml" />
                </ResourceDictionary.MergedDictionaries>

                <!-- MahApps Brushes -->
                <SolidColorBrush x:Key="MahApps.Brushes.Highlight" Color="{DynamicResource Primary700}"/>
                <SolidColorBrush x:Key="MahApps.Brushes.AccentBase" Color="{DynamicResource Primary600}" />
                <SolidColorBrush x:Key="MahApps.Brushes.Accent" Color="{DynamicResource Primary500}"/>
                <SolidColorBrush x:Key="MahApps.Brushes.Accent2" Color="{DynamicResource Primary400}"/>
                <SolidColorBrush x:Key="MahApps.Brushes.Accent3" Color="{DynamicResource Primary300}"/>
                <SolidColorBrush x:Key="MahApps.Brushes.Accent4" Color="{DynamicResource Primary200}"/>
                <SolidColorBrush x:Key="MahApps.Brushes.WindowTitle" Color="{DynamicResource Primary700}"/>
                <SolidColorBrush x:Key="MahApps.Brushes.Selected.Foreground" Color="{DynamicResource Primary500Foreground}"/>
                <LinearGradientBrush x:Key="MahApps.Brushes.Progress" EndPoint="0.001,0.5" StartPoint="1.002,0.5">
                    <GradientStop Color="{DynamicResource Primary700}" Offset="0"/>
                    <GradientStop Color="{DynamicResource Primary300}" Offset="1"/>
                </LinearGradientBrush>
                <SolidColorBrush x:Key="MahApps.Brushes.CheckmarkFill" Color="{DynamicResource Primary500}"/>
                <SolidColorBrush x:Key="MahApps.Brushes.RightArrowFill" Color="{DynamicResource Primary500}"/>
                <!--タイトルの文字-->
                <SolidColorBrush x:Key="MahApps.Brushes.IdealForeground" Color="{DynamicResource Primary500Foreground}"/>
                <SolidColorBrush x:Key="MahApps.Brushes.IdealForegroundDisabled" Color="{DynamicResource Primary100}" Opacity="0.4"/>
            </ResourceDictionary>
        </Application.Resources>
    </prism:PrismApplication>
上記のハイライトした部分を追加してみてください。
これは、デザインの情報でMahAppsのGitHubから引っ張ってきたものを使用しています。
まずはコピペでいいでしょう。
起動確認
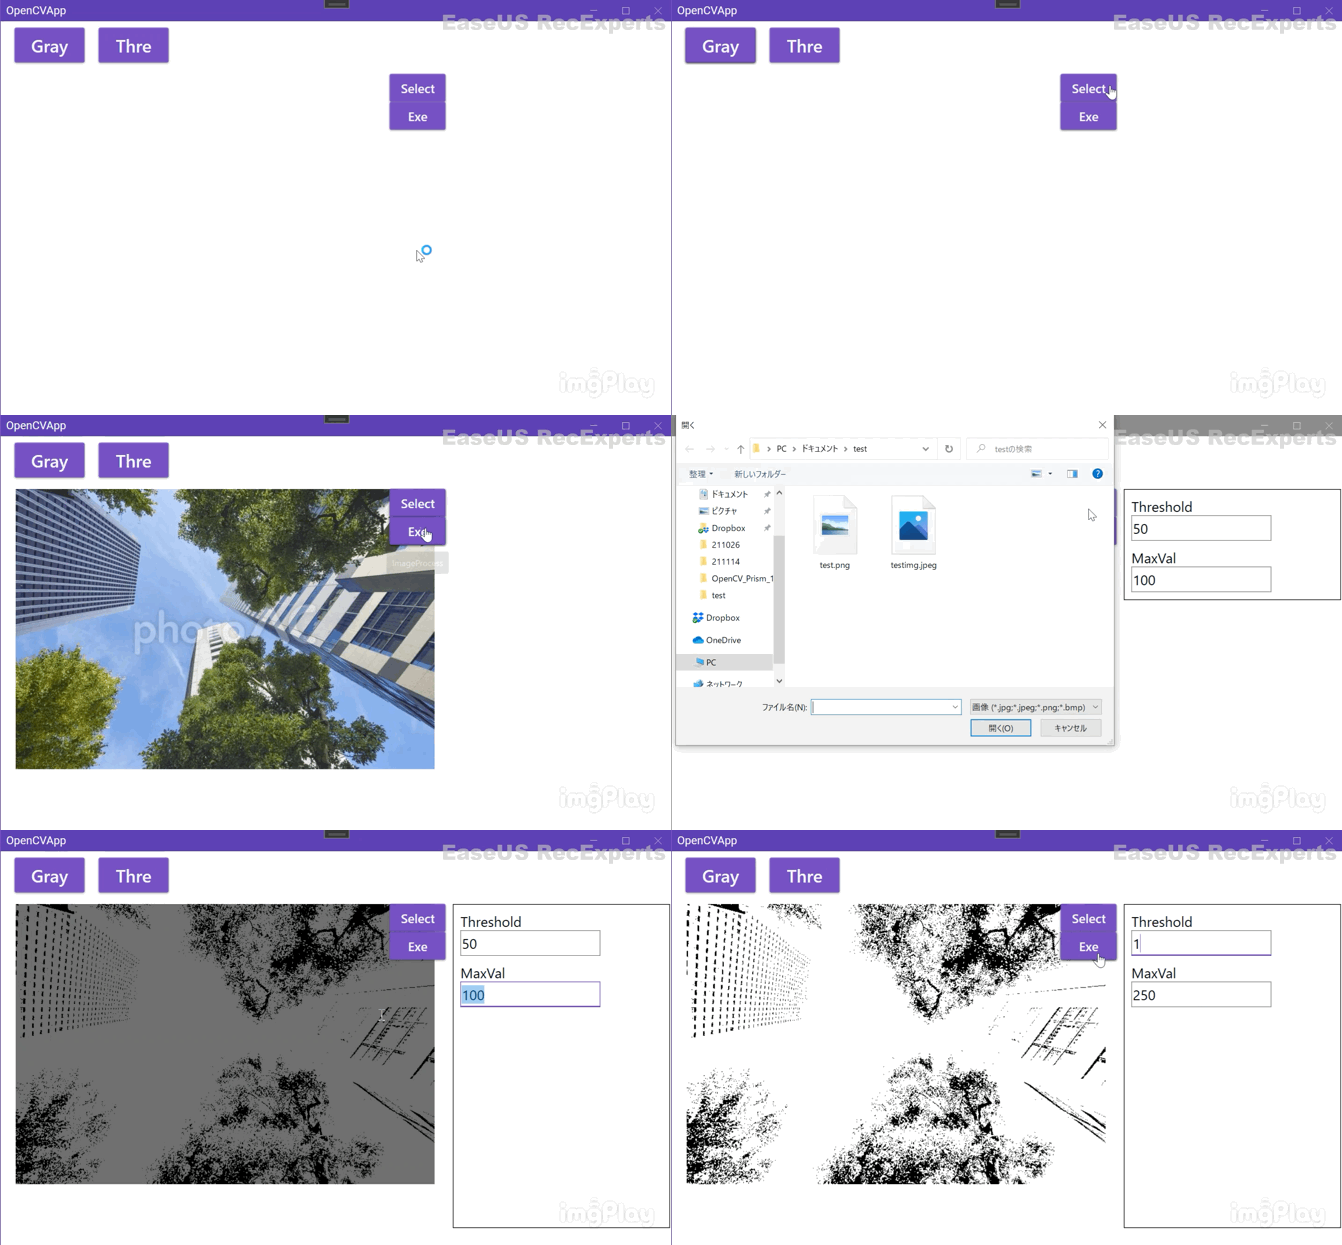
ここまで来たら起動してみてください。

上記のような画面で起動出来たら成功です。
まとめ&次回予告
今回は、画面の表示を変えるMahAppsを導入しました。
簡単にいい感じにしてくれるので重宝しますね。
是非、利用してみて下さい。
次回は、OpenCVでフィルタ処理を追加していきたいと思いますので、よろしくお願いします。
 ゆたんぽBLOG

