こんにちは、ゆたんぽです。
引き続き、Prism、ReactiveProperty、OpenCVを利用した画像処理アプリを作成していきます。
今回は、前回インストールしたMahAppsを使用して、テキストボックスをMahAppsのNumericUpDownへ変更していきます。
テキストボックスだとキーボードが必須ですがNumericUpDownを使用するとマウスのみで使用できることもあるので覚えておきましょう。
また、MahAppsのNumericUpDownを使用することでデザインが少し良くなりますのでお勧めです。
目次
MahApps_NumericUpDownの実装
それではさっそく実装していきましょう。
前回までに作成したアプリを使用していきます。
ParamInputAreaThreshold.xamlの実装
まずは画面のViewから実装していきます。
テキストボックスをMahAppsのNumericUpDownへ変更していきます。
<UserControl x:Class="OpenCV_Prism.Views.ParamInputAreaThreshold"
             xmlns="http://schemas.microsoft.com/winfx/2006/xaml/presentation"
             xmlns:x="http://schemas.microsoft.com/winfx/2006/xaml"
             xmlns:prism="http://prismlibrary.com/"
             xmlns:mah="http://metro.mahapps.com/winfx/xaml/controls"
             prism:ViewModelLocator.AutoWireViewModel="True">
    <Grid Width="auto" Height="auto">
        <Border BorderThickness="1" BorderBrush="Black">
            <StackPanel VerticalAlignment="Top" HorizontalAlignment="Left" Margin="10">
                <TextBlock Text="Threshold" HorizontalAlignment="Left" FontSize="20"/>
                <mah:NumericUpDown x:Name="Threshold"
                                   BorderThickness="1"
                                   Width="200"
                                   HorizontalAlignment="Left"
                                   Minimum="0"
                                   Maximum="255"
                                   Interval="1"
                                   FontSize="20"
                                   Value="{Binding Threshold.Value, UpdateSourceTrigger=PropertyChanged}"/>
                <TextBlock Text="MaxVal" HorizontalAlignment="Left" Margin="0,10,0,0" FontSize="20"/>
                <mah:NumericUpDown x:Name="MaxVal"
                                   BorderThickness="1"
                                   Width="200"
                                   HorizontalAlignment="Left"
                                   Minimum="0"
                                   Maximum="255"
                                   Interval="1"
                                   FontSize="20"
                                   Value="{Binding MaxVal.Value, UpdateSourceTrigger=PropertyChanged}"/>
            </StackPanel>
        </Border>
    </Grid>
</UserControl>
上記のプログラムを説明して行きます。
まずは、5行目にある下の1行でMahAppsを利用できる準備をします。
xmlns:mah="http://metro.mahapps.com/winfx/xaml/controls"次にテキストボックスをNumericUpDownへ変更していきます。
<mah:NumericUpDown x:Name="Threshold"
                   BorderThickness="1"
                   Width="200"
                   HorizontalAlignment="Left"
                   Minimum="0"//①
                   Maximum="255"//②
                   Interval="1"//③
                   FontSize="20"
                   Value="{Binding Threshold.Value, UpdateSourceTrigger=PropertyChanged}"/>
上記のように mah:NumericUpDownを追加することでMahAppsのNumericUpDownを追加することができます。
①Minimumで入力する値の最小値を設定することができます。今回は、マイナスの値はありえないので”0”に設定してあります。
② Maxmumで入力する値の最大値を設定することができます。今回は、255よりも大きい値はありえないので”255”に設定してあります。
③Intervalで数値をUpDownする間隔を設定できます。今回は1ずつ上げていきたいので1を設定しています。
ParamInputAreaThresholdViewModel.csの実装
Viewの後はViewModelを変更していきます。
今まではテキストボックスだったのでString型に設定していたパレメータをDecimal型へ変更していきます。
using OpenCV_Prism.Models;
using Prism.Commands;
using Prism.Mvvm;
using Reactive.Bindings;
using Reactive.Bindings.Extensions;
using System;
using System.Collections.Generic;
using System.Linq;
using System.Reactive.Disposables;

namespace OpenCV_Prism.ViewModels
{
    public class ParamInputAreaThresholdViewModel : BindableBase
    {
        #region 【メンバー】

        // リアクティブプロパティ破棄
        protected CompositeDisposable _disposables = new CompositeDisposable();

        ImageThreshold imageThreshold;

        #endregion

        #region 【プロパティ】

        public ReactiveProperty<decimal> Threshold { get; }

        public ReactiveProperty<decimal> MaxVal { get;}

        #endregion

        public ParamInputAreaThresholdViewModel()
        {
            imageThreshold = AppSetting.Instance.ITh;

            Threshold = imageThreshold.ToReactivePropertyAsSynchronized(x => x.Threshold)
                .AddTo(_disposables);

            MaxVal = imageThreshold.ToReactivePropertyAsSynchronized(x => x.MaxVal)
                .AddTo(_disposables);

        }
    }
}
ImageThreshold.csの実装
最後にModel側のImageThresholdを変更していきます。
こちらもString型をDecimal型へ変更していきます。
using OpenCV_Prism.Abstract;
using OpenCV_Prism.MyExtension;
using OpenCvSharp;
using OpenCvSharp.Extensions;
using OpenCvSharp.WpfExtensions;
using System;
using System.Collections.Generic;
using System.Linq;
using System.Text;
using System.Threading.Tasks;

namespace OpenCV_Prism.Models
{
    class ImageThreshold : ImageProcess
    {
        #region 【プロパティ】//①

        public decimal Threshold { get; set; }

        public decimal MaxVal { get; set; }

        #endregion

        #region 【コンストラクタ】//②

        public ImageThreshold()
        {
            Threshold = 50;

            MaxVal = 100;
        }

        #endregion

        public override void myRun()
        {
            //BitmaoImage⇒Matへ変換
            using (var src = _originImage.ToMat())
            using (var dst = new Mat())
            using (var dst_thre = new Mat())
            {
                //グレー画像へ変換
                Cv2.CvtColor(src, dst, ColorConversionCodes.RGB2GRAY);
                Cv2.Threshold(dst, dst_thre, (double)Threshold, (double)MaxVal, ThresholdTypes.Binary);//③

                //Mat⇒Bitmap⇒Bitmapへ変換
                Image = BitmapConverter.ToBitmap(dst_thre).ToBitmapImage();
            }
        }
    }
}
①以前に設定したパラメータのSting 型をDecimal型へ変更します。
②Decimal型なので初期値は数値をそのまま入れています。
③ Cv2.Thresholdで使用されるパラメータはDouble型ですのでDoubleでキャストしています。
実装結果
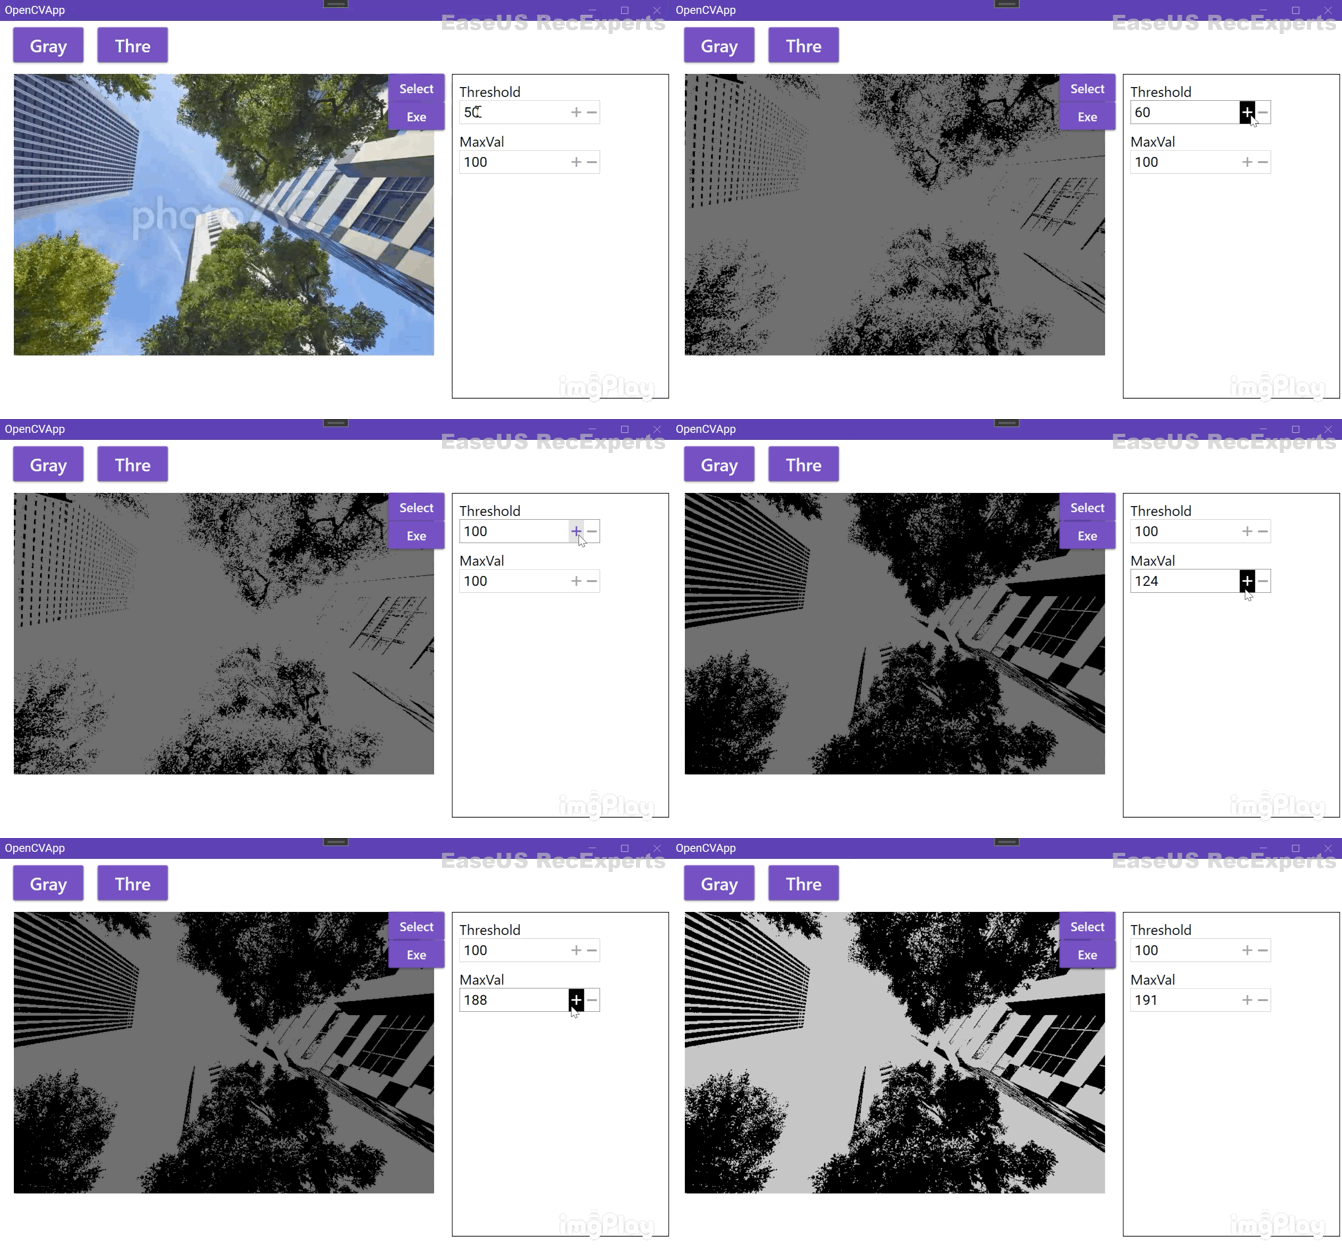
下記のように数値を1ずつ変更できて値がImageThreshold側に伝わっていれば成功です。

まとめ&次回予告
今回は、MahAppsのNumericUpDownの実装方法をご紹介してきました。
内容は短いですがよく使う機能なので試してみてください。
次回は、フィルタ処理を実装していきますので、よろしくお願いします。
 ゆたんぽBLOG
